
Note: I am not a professional and do not claim to be an expert. Please be sure to always read instructions for all tools and products. Safety is very important and should be your top priority. Wear necessary protection when using tools (eye wear, hearing protection, gloves, etc.) and dust masks when sanding or cutting. Sarah Flips It is not responsible for any injury or damage. All of my designs are not professionally designed and are for private use only.
With our little baby girl on the way, I needed more space for my two toddler boys and decided to take on the challenge of building a bunk bed! After hours and hours of planning, the project went surprisingly well and I’m so happy with how it turned out. So excited to share every step of my DIY bunk bed building journey with you. So, let’s dive into the details and tell you all about how it went!
Table of Contents

How do I build a bunk bed?
Thinking about jumping into a DIY furniture project? I know it might sound a bit intimidating initially, but here’s the thing – you don’t have to be a pro to have a workshop full of fancy tools. All you really need are a few simple tools, some careful planning, and a willingness to learn! Viola! You’re on your way to creating something amazing.
Whether you’re dreaming of doing a DIY bunk bed build, a DIY ice cream cart, or a mirror revamp, the biggest hurdle is usually just getting over the fear of failing or messing up. Familiarize yourself with the basics – a saw, a drill, and some measuring tools. You’ll be amazed at how these simple tools can unlock a whole world of DIY possibilities!
Remember, the beauty of DIY is not just in the finished product but in all the cool skills you pick up on the way. And guess what? With some basic wood, a handful of tools, and a little time, you can transform your kid’s room into the coolest bunk room ever! Trust me, it’s way easier than it looks, and the journey is packed with fun DIY learning moments that I will teach you. Let’s get started with this DIY bunk bed transformation. You ready??
Supplies for Your Bunk Bed Build
Tools:
- Miter saw
- Corner clamps
- Framing Nail Gun or screws and regular drill
- Nail gun
- Brad nailer
- Jigsaw
- Multi-tool
- Stud Finder
- Drill
- Measuring tape
- Level
- Sander
- Paint sprayer (or painting supplies)
Lumber:
- 2×4 common board for the bunk bed walls and bases
- 1×3 common board for the slats for the bases
- ¼” plywood sheets for faux shiplap
- ½” plywood sheets for facing the entire build
- 1×8 common wood for facing the front of the bunks
- ¾” molding for framing out the nooks
- 1×3 oak board for the railing
- 1×4 oak board for the ladder
Materials:
- 4” Structural screws
- Screws, nails and brads for tools
- Wood filler
- Sandpaper
- Caulk
- Kelly-Moore Kel-Bond Primer
- Behr Cabinet & Furniture Paint (Color: Gloucester Sage by Benjamin Moore)
- Wood glue
- Trim screws
- Minwax Polycrylic sealant in Satin
- Pre-taped plastic cover
How to Build Bunk Beds to Fit in Your Space
1. Sketch, measure, & visualize. Plan, plan, plan.
The more research you put in and prep work you do, the smoother your build will be. I promise. Start by measuring your mattresses & sketching out your build. I went through a few different design plans. I don’t think giving you specific measurements will help you much because your room will likely be a different size and shape than mine, but you will want to start with the space that will fit the mattress. I added an inch in every direction, but I wish I would have left two because making that top bunk is not my favorite thing in the world, haha.
I also mapped my measurements out on the wall with painter’s tape to get a visual of what it would look like in the end, and it’s always so helpful to ensure it’s what I’m wanting. Again, more planning. Told you.
2. Build the 2 mattress bases
I started by building the base of my bottom bunk. This is built out of 2x4s and I used my miter saw to cut the lumber. It’s easiest to have a space where you can lay out the boards when you’re assembling.
Using corner brackets, create your bottom bunk base. To do this, create a rectangle base with a supporting beam through the middle. I used my framing nail gun, but you could use traditional screws if you don’t have a framing nail gun. Power Pro screws are awesome because you don’t have to pre-drill holes. These can be found at Lowes or Ace Hardware.
Create another base the same as step 2. This will be the base for your top bunk. If you want to make a loft bed, you could just create one base, and keep going.
3. Build the 2 walls
I wanted the first vertical wall of my bunk beds to have nooks for books/nighttime drinks, so that part of the build is a little more complicated. I created, similar to the base, a rectangle of 2×4. Then I added a second 2×4 to each of the outside sides. Then I added 2 support beams on either side of what will become my nooks. Then I added a smaller rectangle frame to the base of my wall, which will give it more stability.
The second vertical wall will be built similarly to the bases. Just a rectangle with a support beam up the middle. My plan is to do the ladder in the second vertical wall, so plan for how wide you want your ladder and space for getting onto the top bunk.
4. Remove the baseboards
To get the bunks flush against the wall, you’ll want to remove the baseboard of the walls that we are attaching the bunk bed to. This is easy to do, just measure where your cut will be, then cut the baseboard with a multi-tool vertically. Marking the baseboards with a speed square is helpful to ensure a striaght line when you cut. You can use a trim remover tool or really anything flat to pry the trim away from the wall.
5. Assemble your frame
Time to assemble. You’ll need help for this step, trust me. Install your first vertical wall, and attach to the studs with 4” structural screws into the ceiling and the wall studs. Then install your second vertical wall, again to studs in the ceiling and wall with 4” structural screws.
Then install your bunk bases by securing them to the vertical walls and to the studs in the wall of your room. I left a space below the bottom bunk for drawers and about 4’ between the top of the bottom bunk and the bottom of the top bunk. This is also the time you’ll decide how high you want the top bunk to be. I left a little extra room on the bottom bunk so I could comfortably sit up on my kid’s bottom bunk.
6. Create bases for the mattresses
Create the slats for your bunk bed by cutting 1×3 common board to fit in the base of your bunks. You will need enough slats to make a slat every other 3” along the base. I used one of my slats as a spacer, then attached them to the base with my brad nail gun.
7. Faux shiplap wall (optional)
I wanted a shiplap look on the back wall of my bunks, so I created a faux-shiplap wall on the back by ripping ¼” plywood down to create 6” slats and nailing them evenly down the back wall using a quarter as a spacer.
8. Add framing for nooks (optional)
I finished adding my nooks to the first vertical wall by installing two horizontal boards between my vertical boards to add a little nook above both the bottom and top bunks on the first vertical wall. You’ll use a scrap piece of wood to attach them to the vertical boards.
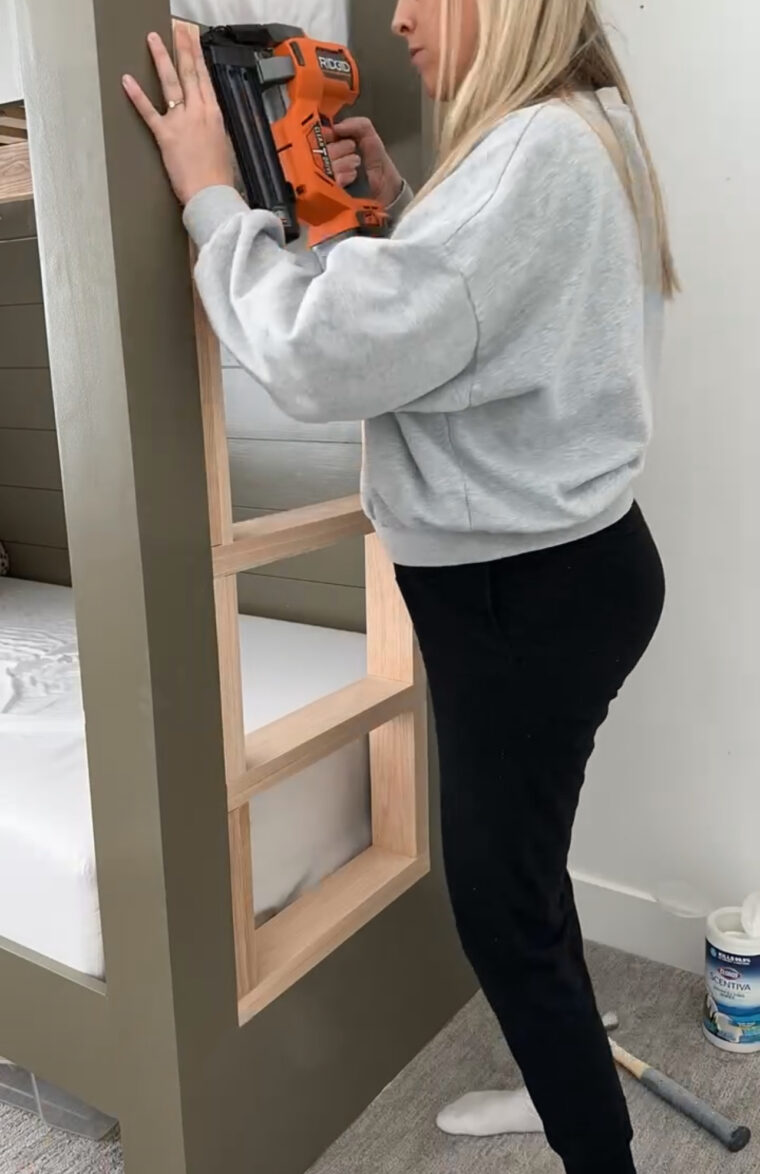
9. Time to face it out!
Cut out a sheet of 1/2” plywood to cover the 2x4s on the first vertical wall. Then use a jigsaw to cut out the nooks we just built into the first vertical wall. I drilled a hole big enough to fit my hand through and then traced the 2×4 nook framing so I knew where to cut with my jigsaw! This doesn’t have to be perfect if you plan on framing it out like I did. Attach the 1/2” plywood to the first vertical wall with a nail gun.
Repeat step 12 with the second vertical wall, only covering half of the 2×4 wall. The other side will have the ladder, so don’t cover that side up. Add pieces of plywood to the outside of the second vertical wall as well, to completely cover the 2×4 on the second vertical wall.
Add small pieces of plywood to finish out the nook, and along the hole in the second vertical wall where the ladder will finish. I added ¾” molding around each of the nooks for a finished touch.
I faced out the front of the bunk bed with 1×8 common board, but you could use MDF for this step as well. I cut down one piece to be about 3” wide for the vertical beams, and then added full 1×8 boards along the bases to keep the mattresses where they should be.
10. Fill holes & wood seams
Add wood filler to any crack or hole. If there is a place where two pieces of wood come together, add wood filler. This task is huge, but it is so worth it for a professional look in the end. When you have all your wood filler added, sand the whole project. You might have to repeat this a couple times to get every hole and make it nice and smooth. Since this project is inside, I recommend attaching your orbital sander to a shop vac for dust management. I just use tape for this.
11. Caulk where wood meets wall
Once you’ve sanded your bunks clean, it’s time for the finishing touch: Caulk. You’ll use caulk anywhere the bunk meets the wall to give it a real built-in look. Make sure to cut your caulk tip at an angle and use A TON of baby wipes to keep your fingers and hands clean.
12. Paint & primer, yay!
I decided to paint my bunk beds. I used a Graco TC Pro Paint Sprayer which made the process SO much faster and the finish is amazing. However, you can totally do this with a brush and roller. I recommend getting cabinet rollers for smooth surfaces. For my paint and primer, I did two layers of Kelly-Moore Kel-Bond Primer, then 2 coats of Behr Cabinet and Furniture Paint in the color Gloucester Sage by Benjamin Moore. Be sure to tape off and cover anything you don’t want paint on. I used carpet tape on the ceiling and pre-taped plastic on the sides!
13. Building the railing
For the railing, I went with natural wood. That’s why I waited until I was done painting. I used 1×3 white oak. Be warned, this stuff is not cheap. Buuut it is beautiful. Start by measuring and cutting a piece of the oak to go across the entire top bunk. Decide how tall you want your railing (I went with 18”), then cut the slats to go on your railing. Cut another piece that is the entire length of your top bunk. Create a rectangle with slats, basically, for your railing. Attach the railing pieces with glue and clamps, then trim the screws. Drill a pilot hole first to avoid cracking the wood! This was the most tricky part. If I redid this project, I would probably do pocket holes instead.
If you’re using natural wood like I am for your railing, wood fill as needed, sand, then seal your railing so it will last as long as your bunk beds do. I used the Minwax Polycrylic in satin and did a light sanding with 220 grid sanding blocks for a smooth finish.
14. Attach the railing
Attach your railing to your bunk bed, following the same steps as adding the slats to your railing. Use clamps to attach your railing to the bunk bed, drill good pilot holes, then attach the railing using trim nails because your 1×3 is so narrow.
I also went back and re-enforced the railing on the back side with L shaped brackets (three on each side) to make sure it was super solid.
15. Building the ladder
I used the same white oak but 1×4 size for the ladder. You’ll need both the rungs and the side pieces. I decided to double up all my 1x4s as I was adding them. Start at the base, add 1 1×4, then wood glue, then another 1×4, then nail them together to the vertical wall.
Then I added 2 1×4 pieces to each side of the nook, again adding wood glue between the pieces and nailing them to the vertical wall. Continue this process all the way up the nook to finish the ladder.
Add wood filler where needed on the ladder, sand it (carefully to not sand any of the painted wood) and add the Minwax Polycrylic. I love that sealant because it doesn’t change the color of the wood.
TA-DA!
Just like that, your bunk bed is done! What a project. Hopefully, it is everything you hoped it would be now that it is finished! I know my boys love ours.

Tips and Tricks
- Make sure you have all the necessary materials and measurements before starting. This will help you not have to take 10000 trips to Home Depot and allow you to have a smooth project.
- Measure twice and cut once. This old adage isn’t just great advice. It might save you from having to buy more wood! Take your time with measurements and cuts for a seamless assembly.
- Be sure you are priming and using the right paint. If you want it to last for years to come, doing the right prep and using the right paint is ESSENTIAL.
How long does it take to build a bunk bed from scratch?
The timeline for building a bunk bed from scratch can vary based on factors such as experience level, complexity of the design, and the availability of tools and materials. For beginners, it might take several weekends or a few weeks to complete the project, allowing time for learning, adjustments, and the application of finishing touches. More experienced DIY enthusiasts might finish the task more quickly, within a week or even a few days. Working around kids, appointments, work, and everything else we had going on took me about 4 weeks to complete ours.
Ultimately, I love how our moody green bunk bed project turned out. I know you can make one, too! So, take the leap! Your dream bunk bed awaits, and with patience and practice, you’ll love saying, “I built that.” Happy building!

Another comment.
Special styles for comments by an admin.