
Note: I am not a professional and do not claim to be an expert. Please be sure to always read instructions for all tools and products. Safety is very important and should be your top priority. Wear necessary protection when using tools (eye wear, hearing protection, gloves, etc.) and dust masks when sanding or cutting. Sarah Flips It is not responsible for any injury or damage. All of my designs are not professionally designed and are for private use only.
When my cute niece came to me and asked if I’d make her an Ice Cream Cart for her wedding, I was 100% in! This fun DIY Ice Cream Cart is a project that is so much bang for your buck. You’ll love how easily it comes together and love the finished look and functionality!
Table of Contents

After looking at Pinterest (for probably way too long!) for inspiration, I couldn’t help but swoon over these adorable Ice Cream Carts! I knew I could make a version that was more budget-friendly, easily customizable, and fun to build. I got right to work and came up with this adorable Ice Cream Cart idea using a premade Rolling Ice Chest Cooler Cart! This means there’s no complicated process of figuring out how to keep the ice cream frozen. Your ice cream will stay cold all night, and the cart can be a fun backdrop for your wedding or event!
With just some wood, basic tools, and a little time, you can also turn this cooler cart into the Ice Cream Cart of your dreams! It’s really not as hard as it looks, and you’ll have a beautiful focal point for your next event or reception.
Supplies for Your DIY Ice Cream Cart
Tools:
- Set of 4 – 5” Caster Wheels
- Graco Cordless Paint Sprayer (optional, but highly recommended!)
Lumber:
- (4) 2×2
- (8) 2×1
- (3) ¼” Plywood
- 1×3 Boards for Molding
- MDF Sheet
- 1” Dowel for Handle
Materials:
- 80 Quart Rolling Ice Chest Cooler Cart
- Bolts
- Sherwin Williams 7757 – High Reflective White
- DAP Alex Flex Molding Caulk
- Kelly Moore Kel-Bond Universal Primer
- Wood Filler
- Loctite Tite Foam
How to Create a DIY Ice Cream Cart
1. Build your DIY ice cream cart
Your first step will be putting together your Ice Chest Cooler Cart. This will be the foundation of your Ice Cream Cart because it’ll keep your ice cream cold all night. Put your cart together based on the directions included with your cart, except leave off the wheels. We’re adding other, more heavy duty wheels later.
Measure all around your cart, noting how tall, deep and wide it is. We will essentially be building a box around the entire cart, so take those measurements.

Begin by building a frame for your cart to sit on using 2×2. I extended mine out a bit to make it the length that I wanted. You can really make your cart as big or small (as long as it’s not smaller than the cooler cart) that you’d like. Attach this base to your cooler cart using bolts and the holes in the cart for the wheels.
Create side wall frames using a pocket hole jig and 1×2. Again, as long as your box completely covers the cooler cart, make these walls as wide or narrow as you’d like.
When you have your frame, begin adding plywood to your sides. I attached the plywood with a brad nailer.
If your cooler has a drain like mine does, cut a small hole, large enough for a hand to reach through, in the plywood on that side. We’ll frame it up later, so it doesn’t need to be super pretty.
Add your 1×3 boards to the plywood as a molding. I framed all 4 sides of each wall of the cart. I used a combination of liquid nails and my brad nailer to attach these boards.
2. Add your handle
Add your handle hole by cutting your top molding on two sides about 12” longer than they need to be. Use a spade bit to drill a small indentation where the dowel will fit.
Cut your 1” dowel to fit between the molding. Place it between your two molding pieces, then adhere the molding to the cart, as you’ve been doing.
Add caulk anywhere two boards meet. This includes the corners of your cart, and anywhere the molding connects with the plywood. This will give a smooth, finished look. Also, fill any holes from your nails with wood filler.
3. Build top
Cut down a piece of MDF to fit on the top of your cooler. Measure from the edge of your cart to the lip of the cooler on all sides. Pencil lines that will guide you, and use the lid from your cooler to draw the outline of your hole.

Cut your hole out using a drill to start a pilot hole and then a jigsaw to follow the lines around. Your hole should fit perfectly over your cooler if all your measurements are correct! If not, you can continue to adjust or start over with a new piece of MDF.
Attach your top to your cart!
4. attach wheels
Flip your cart over and attach your wheels. I added two pieces of 2×4 perpendicular to my base, drilled pilot holes for all the screws, then attached the caster wheels directly to those wood pieces.
5. Seal around your cooler
Seal around your cooler with Loctite Tite Foam. This comes with a straw-looking tube, which is great to get the product right where you want it. Go all the way around your cooler. It doesn’t need to be super pretty. When it’s hard, we’ll trim it down.
6. Create your canopy
Create your canopy by adding pocket holes to two pieces of 2×4 and attaching them to the sides of your top, centered on the width side. Add a 3rd piece of 2×4 across the top, giving you something to anchor your canopy to.
Use scissors or a box cutter to trim your sealant foam down to be flush with the top of your cart. Add a bit of caulk around the edges to smooth it down.
Add a piece of plywood to the top of your cart, acting like a canopy. This piece can be nearly any size you’d like. Attach it to the 2×4 across the top of your cart with screws.
I cut up some leftover wood to add a border to the top canopy piece because it looked unfinished. I attach them to the edges of the canopy with wood glue and my brad nailer for a fun, decorative look.
7. Prep your cart for paint
Prep your cart for paint by taping off the inside of the cooler and lining it with plastic. Cover your wheels with paper/tape.
Start with a coat of primer and then add 2-3 coats of paint to the cart. I used my handy paint sprayer to paint my cart, but you could also use a regular paintbrush or roller. Don’t forget to paint the lid to match the rest of the cart.

8. Add your knobs
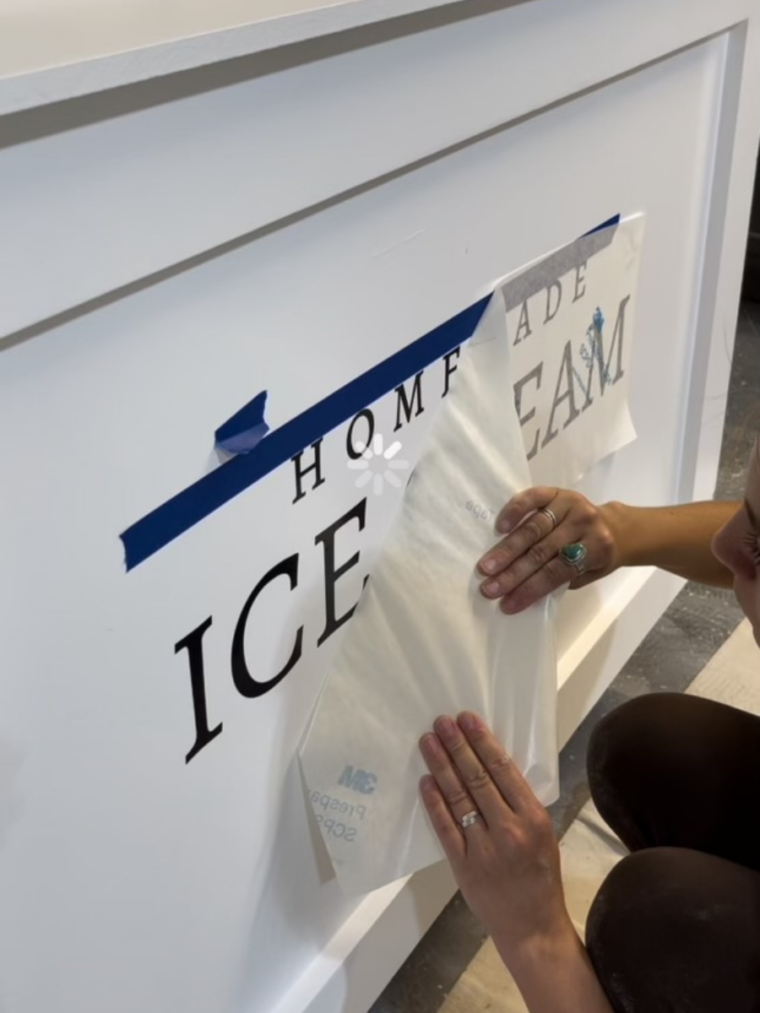
Add your knobs (I changed mine out for some beautiful gold knobs), beautiful battery-operated lights, and vinyl lettering on the side, and your cart is finished!
Tips and Tricks
- Make sure you have all the necessary materials before starting. This will help you not have to take 10000 trips to Home Depot and allow you to have a smooth project.
- I think you could use another ice cooler in this project, though I haven’t done it so I can’t say for sure. I think you might be able to follow the same steps for a different cooler, using the measurements from your cooler to guide you.
- I highly recommend adding wood glue for most projects, especially this one because you’ll be moving the cart around and likely be outside in the elements. The wood glue just adds an added layer of protection.
What Else Could This Cart Be Used For?
Literally anything! It’s just a cooler with a cart base. You could fill the cooler with drinks or another treat. You could use the cart to display donuts or cookies. The cart itself doesn’t even need to be a cooler! You could use the same process to create a cute cart for bake sales or another event. The possibilities are as limitless as your creativity with this one.

Ultimately, this fun cart is a great project to expand your DIY experience and create a cute backdrop or focal point for your next event. With a little time, some common tools, and a few materials, you could create a fun cart that is Pinterest worthy and have your guests wondering where you bought such a cute piece!


